![]()
|
2018-6-25 crank case |
前回の更新から1か月以上たってしまいました。
図面の細かい手直しとか、段取りがきまらないとかで苦労していました。
それでも何とか初期の目論見通りクランクケースができました。
オイルポンプからクランクケース壁内を通り、シリンダーヘッドロッカーアームに給油するオイル経路の穴あけに苦労しました。
一時は普通の攪拌タイプの潤滑にしてしまおうかと迷いましたが、何とかドライサンプのめどが立ちました。
One month has passed after last update.
I had to revise the drawings and check the set up for oil path drilling.
Oil path in the crankcase wall is complicated, so I almost decided to use
the lubrication depend on the wet sump.
But I checked it again and again, I could find the oil path which do not interfere any bolt holes
130Φ 2024ジュラルミンです。 たまたま頂き物がありました。ラッキーでした。 Material for crank case, 2024 duralumine. |
大きいので外爪作業です。 Facing |
Marking for cutting |
小一時間かかりました。 Cut with band saw. It took about one hour. |
Now for turning and milling. |
この面がすべての基準になります。 Mill the standard surface. |
厚みが6㎝近くあるので穴あけもなかなか大変です。 曲がってしまわないよう開け始め15㎜ほどは超鋼ドリルを使っています。 超鋼ドリルは短いのでその後は普通の鉄鋼ドリルに変えています。 60㎜を貫通するためには最低で4㎜のドリルが必要でした。 ロングシャンクのドリルは長すぎてフライスでは使えません。 Using the coordinate, drill all the holes for outer contour. |
4爪チャックにくわえセンター出しをしたのちクランクケース内側ボーリングをします。 First step for boring. |
using 26mm drill |
Boring was completed |
Turning the bearing cavity |
22.5度傾けて冶具にセットしました。 Next step is milling the cylinder surface. Set on the jig with 22.5 degree. |
Milling |
このままボーリングバーを使ってシリンダを受ける穴をあけてしまう方法もありましたが、 ボーリングバーの信頼度がいまいちなので旋盤を使うことにしました。 Drilled and tapped for cylinder stud bolt |
| On the lathe with face plate and jig, first find the center. |
| boring |
| シリンダーライナー外形を38.00mmにする予定なのでこの部分は38.03から05くらいに仕上がっていれば大丈夫でしょう。 one part was finished |
| 9気筒から比べればあっという間の作業なのですが。 second one |
| 結構時間がかかります。 cut the outer contour with band saw |
| Milling |
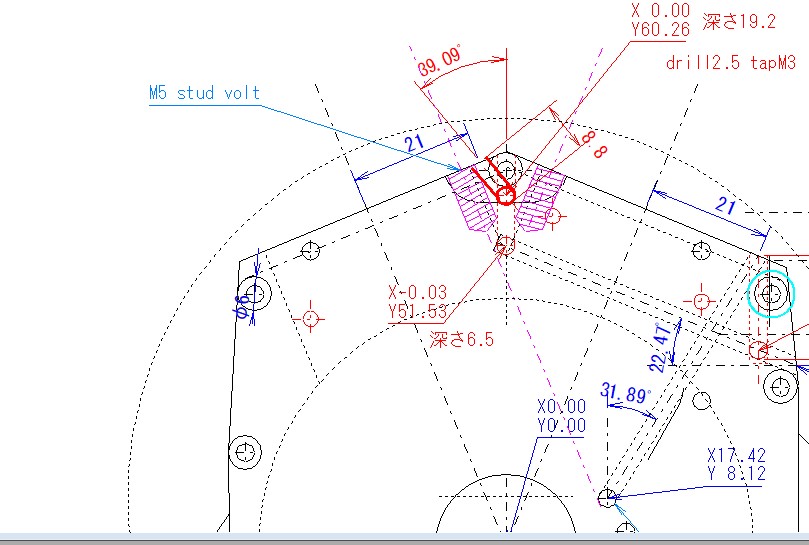
| 各穴につき固定冶具が毎回必要になります。 レーザーで一応チェックしています。 To drill the oil path, set the crank case 39.09 degree and check the path with laser beam |
| 大丈夫のようです。 Laser came just center of the drill |
 ちなみに上記の穴あけは図面の赤い太い線で描いてある縦穴です。クランクケースy軸に対して39.09度傾いています。 ちなみに上記の穴あけは図面の赤い太い線で描いてある縦穴です。クランクケースy軸に対して39.09度傾いています。クランクケースをこの分回転させて冶具に固定して穴あけをしています。 I drill the hole written by red line. Every hole need the jig for drilling. |
| I inserted tooth picks to confirm every path connected to another path. |
| 一応全部つながっています。 このままでオイルが全部吹き出してしまいますので、外壁部はM3セットスクリューでふたをします。 It looks like a hedgehog. End of the hole will be plugged with M3 set screws. |
| 本来なら上からエンドミルで丸く削ってしまえばいいのですが、壁に近すぎでチャックが干渉してしまい加工できませんでした。 仕方ないので細いエンドミルで横から加工しています。 Milling the engine mount |
| Completed |
| Another view |