![]()
|
2019-2-7 cylinder part 1 |
今回はシリンダーです。前回からだいぶたってしまったので途中までなのですがアップします。
CNCフライスがもう一軸あり、知識があれば外形を一気に切削できるのですが、どちらもありません。
ほとんどが手作業と段取り勝負でした。
It has been long time from last update.
I'm now on the way but I report the interim progress.
If I had 4 axis CNC machine, I would mill it in one process, but I don't
have it, I had do it with setup and jig.
2017ジュラルミンを使いました。 100Φ70㎜ 失敗を考慮して3個準備しました。 結構高額になりました。 Material. A2017 They are not so cheep. |
しかし2個目の作業ではもう少しましな方法をとることにしました。 First I drilled stud bolt holes using center. In next stage, I must use the center on the lathe chuck, I marked small point just on the 1st lathe jaw. If I used 4 jaw chuck, the mark was not necessary, but it will take a little more time In next cylinder I took another way. |
シリンダーにはライナーを焼き嵌めしますので0.02㎜ほどのマイナス公差でボーリングしてあります。この辺は慣れたのでささっと済みました。 Re-chucking and turning. |
シリンダースカート部を頼りにセンター出しをしています。 このほうが簡単ですし正確です。あともう一個もこの方法をとりました。 In next cylinder I used this way. It is simple and accurate |
drill the holes |
Set on the fixture for CNC milling. |
今回はフラットエンドミルを使いましたが、これだとクーラントが飛び散ります。 クーラントはエンドミルに絡みつくように流れます。ボールエンドミルだと先端に向かい径が細くなり周速が遅くなり飛び散りは起きないのですが、フラットエンドミルだと先端でも周速はおなじなので飛び散ってしまうようです。 そのままではまずいのでクリアーファイルでガードをしました。 どんなに手間がかかってもクーラントの威力は絶大でこれだけは外せないといった感じです。 CNC milling I used flat endmill and it splashed the coolant splendidly. I had to use full barrier around the machine. |
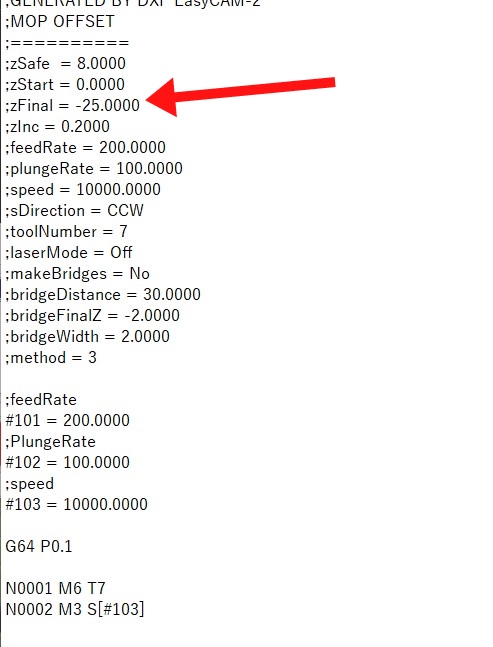
 今回USBCNC付属のEasy CAM2というCAMをつかってGコードを作り、それで切削をしました。 今回USBCNC付属のEasy CAM2というCAMをつかってGコードを作り、それで切削をしました。その中に0.2㎜ずつ25㎜の深さまで同じ切削を繰り返すという作業があったのですが、切削が終わってもどうも深さが25㎜まで行っていない。 Gコードのスタート部分です。ここだけチェックすればzFinal=-25.0000で25ミリ切削してくれそうです。 This time I used Easy CAM2 included in USBCNC. In this code I set Z increment 0.2 and Z final -25mm, but when all the process ended I felt the depth is shallower than I intended. This is the start part of the file. If I checked only this part, Z increment is 0.2 and z final is -25mm |
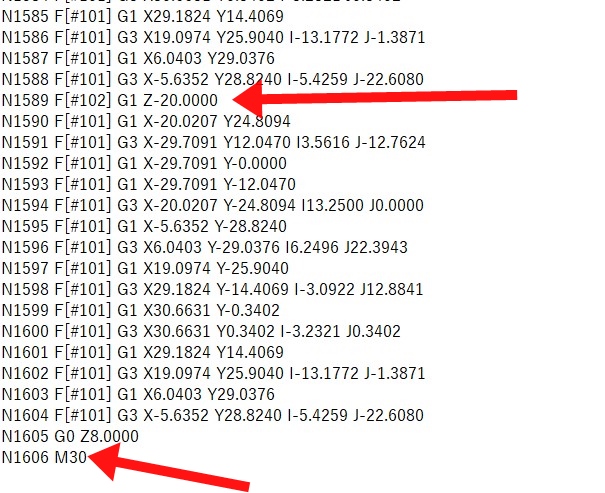
 しかし実際のコードはZ-20.000の切削が最終切削です。 ほかのいろいろな図形でやっても同じ。一回の切込み量を変えたり、深さを変えたりして得られた結論: 同じ操作は100回で打ち切られる! 切込みが0.1なら10mm迄。0.3㎜なら30mmまで行ったら終わり。M30 が出てしまいます。 注意が必要ですね。 This is the last part of the file. The final cut is -20.00mm and ended in M30. I changed the parameters and finally reached the conclusion: Same process stops in 100 times. |
バイスに正確にセットできるように固定具を使いました。 これも上の2番目の方法なら必要ありませんでした。 milling outer contour on the fixture. |
| 本物はここは直線ではないのですが、近似的に直線にしてしまいました。 Set on angle vise. |
| milled out 4 surface |
上の固定具の一部を所定の角度に切削してセットします。 on the fixture to mill slanting surface |
On the vise |
これから手作業で形を整え、フィンをカットします。 以下次号。 finished |