![]()
|
2017-11-27 push rod cover |
今回はプッシュロッドカバーです。
どうやって作るかがスタート時からの課題でした。やっと構想がまとまり作業できました。
This time I made push rod cover.
It was a problem how to make it from the beginning to build this engine.
I could get an idea to make it so I started to make it.
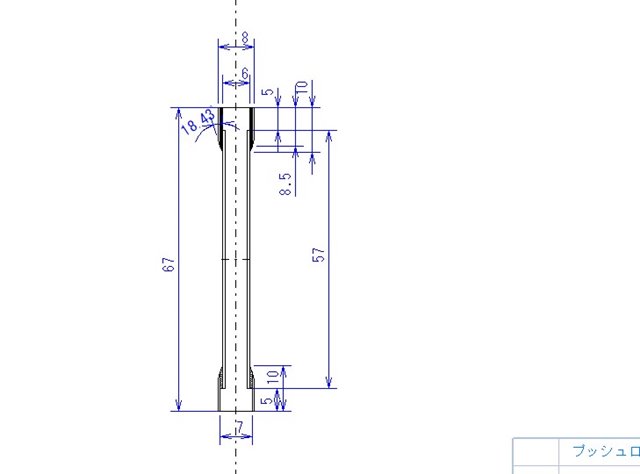
| 作り方に関しては一切記述がありません。 両端をプレスで拡張とか8mmの棒材から外径旋削と内径のドリリングなど考えました。 しかしいろいろ検索してみると拡張はかなり特殊な工具がないと難しそう。 外径旋削とドリリングも相当大変そう。 Original drawings. There is no explanation about how to make it. At the beginning I thought to expand the pipe using press or using bar and turn the outer side and drill the inner side. After looking around the web sites I found that to expand the pipe needs some special tools and is not so easy . Turning and drilling will take long time and not so easy too. |
 モノタロウのサイトを見ていたら、外径8mm 7㎜ 6㎜で肉厚0.5㎜というパイプがあることが判明。 モノタロウのサイトを見ていたら、外径8mm 7㎜ 6㎜で肉厚0.5㎜というパイプがあることが判明。これらを組み合わせれば何とかなりそう。 ということで組み合わせで作ることに決定しました。 I found the pipe outer diameter 6,7,8mm and thickness 0.5mm And I found to make it with assembling these pipes. |
これなら大丈夫そう。 ということで組み合わせで行くことにしました。 I tried to make test one. It goes well. |
| 他の材料から比べると非常に安いです。 工業製品なので精度もとてもよくできています。 I bought pipes, they are very cheap but very precise |
18本の両端につけるため、36個ずつ部品があります。これらをぴったりの長さにそろえ、圧入となると冶具を作る方がはるかに速いです。 ちなみに上の方の短く切ったパイプは勘違いからともに18個ずつ(必要量の半分)しかありません。 途中で気が付いてもう18個ずつ作り足しています。 All parts and jigs The number of short pipes are 1/2 of nester number from my misunderstand |
ピンの所まではめ込んで他端を冶具の長さまで旋削すれば長さはぴったり。 0.01の精度は必要ないのでこれで十分です。 これでも36個ずつ、ものによっては72個だと結構疲れます。 This is the jig for turning the pipe into the decided length. Using this stopper turn the pipe just to the face of the bar, it will be the just size. Using this jig, to turn 36 or 72 pipes is not so easy. |
この段階ではまだ短いパイプが半分しかないことに気が付いていません。 部品の右側にあるのがそれぞれの長さ用の冶具です。 All the pipes. At this point I did not know that the number of short pipe is only one half. You can see the jig for the pipe. |
Push 7mm pipe into 8mm pipe using the vise |
念のため低粘度瞬間接着剤をこの後流しています。 Finished. Fate this procedure I applied a drip of low viscosity instant glue |
20度の角度で旋削しています。 Chambering |
緑矢印の冶具にセットして圧入です。 Press this part on 6mm pipe using the jig. |
このまま圧入すると反対側が動いて深く入ってしまうということが起こります。 それを防止するため反対側にも動かないような冶具をセットして圧入をします。 Set the parts on the jig. |
圧入に際してはどこまで入ったか確認できるように6mmパイプに印をつけておかないと バイスで押しているので圧がかかりすぎてパイプが曲がってしまいます。 (曲げてしまいました) Press the part on 6mm tube |
内径を少し広げて少し余裕を持たせています。 旋削量は0.1mmで大丈夫でした。 Bore 0.1mm to make loose fit on the push rod guide. |
内径を拡張した反対側、ロッカーカバーに入る側は外径を0.25㎜旋削して細くしてあります。 Completed. To make a clearance between the rocker housing and sleeve, the upper part of the sleeve were turned 0.25mm to reduce the outer diameter. |
片方はP7のOリング、もう片方は内径6mmのシリコンチューブを短く切ってがたつき防止にしました。 どちらがいいかまだはっきりしません。 半分はOリング、半分はシリコンチューブをセットしました。 Set on the engine. One applied O ring and another silicone tube. I could not decide which one is better by for now. |
All covers were set on the engine |