

2006-11 crankcase
今回は10日ほど出かけたため更新が少し遅れました。
クランクケースの製作です。
タッッピングだけでも54カ所,指の関節痛になりました。
タッパーの使い方をマスタしなければ・・・
This time I made crankcase.
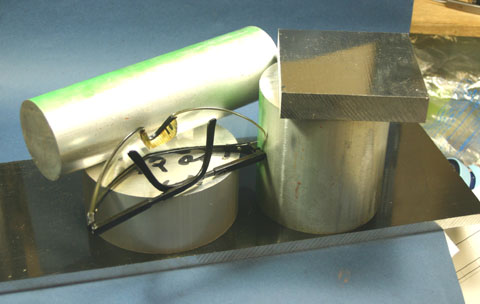 今回購入した材料です。結構量があります。 今回購入した材料です。結構量があります。削り易さを考え、すべて2024です。 All the materials that I bought. I used 2024 aluminum. |
 クランクケース削り出しに先立ちアングルプレートを作成しました。底板についているスピゴットプレート(円盤)はクランクケースボーリング穴にぴったりのサイズに作られています。またスピゴットの右上に見えるピンはクランクケースのフロントハウジング固定穴に合わせて打ってあり、クランクケース削り出しに際し位置決めをできます。 クランクケース削り出しに先立ちアングルプレートを作成しました。底板についているスピゴットプレート(円盤)はクランクケースボーリング穴にぴったりのサイズに作られています。またスピゴットの右上に見えるピンはクランクケースのフロントハウジング固定穴に合わせて打ってあり、クランクケース削り出しに際し位置決めをできます。直角度、ピン位置はかなり厳しく管理してあります。 (これがすべての基準になりますので) First I made an angle plate. |
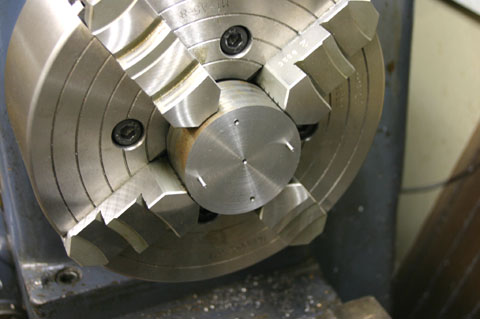 スピゴットプレートは薄くて直接チャックで把持できません。作成のためのヤトイを作りました。はじめにヤトイに正確に固定用ピンとネジ穴をあけ、4爪で芯出しをしました。 スピゴットプレートは薄くて直接チャックで把持できません。作成のためのヤトイを作りました。はじめにヤトイに正確に固定用ピンとネジ穴をあけ、4爪で芯出しをしました。For turning the spigot plate, I first made the holder of that plate. |
 上のヤトイにプレートを固定します。ピンとネジの穴は正確にあけ、ヤトイのそれにぴったりはまります。 上のヤトイにプレートを固定します。ピンとネジの穴は正確にあけ、ヤトイのそれにぴったりはまります。The material for spigot plate on the holder. |
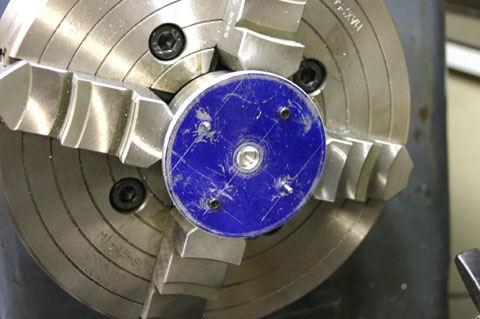 完成しました。76.2+0,-0.02の公差範囲に仕上げました。 完成しました。76.2+0,-0.02の公差範囲に仕上げました。Finished. |
 いよいよクランクケースの削り出しです。120φ50t2024アルミから削り出します。 いよいよクランクケースの削り出しです。120φ50t2024アルミから削り出します。Material for crankcase. |
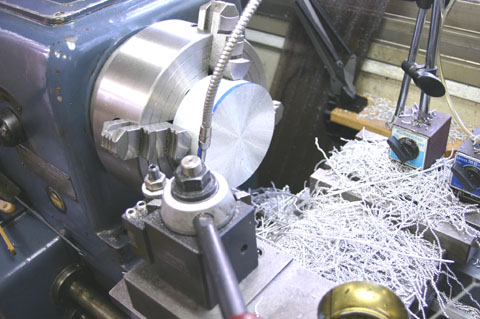 まずは端面けずり。 まずは端面けずり。厚さを44.5にします。 始めから45mmで注文すればいいのですが、50mmで頼むよりだいぶ高いので50mmで注文しました。 おかげで山のように切り子が出ました。しかしこの量も後から出た切り子から見ればわずかなものでした。 Turning the face. |
 端面削りが終わり中心点をけがきます。大きいので従来の固定金具では固定できませんでした。針金と輪ゴムを使って固定してけがきました。 端面削りが終わり中心点をけがきます。大きいので従来の固定金具では固定できませんでした。針金と輪ゴムを使って固定してけがきました。両端面にセンタのずれのない、位置が36度ずれた,PCDが違う穴を各10個あけなければなりません。 Scribing. It is too big for the fixture that I usually use. I used wire and rubber band. |
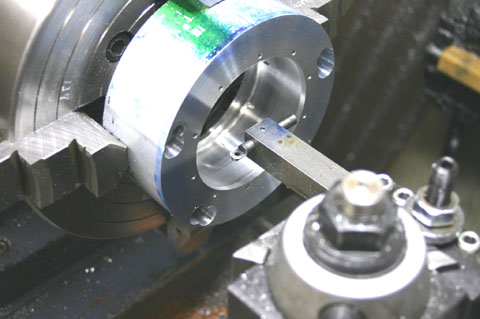 全ての穴あけが終わり、内径を76mm程度にボーリングし更に中繰りを終えたところです。 全ての穴あけが終わり、内径を76mm程度にボーリングし更に中繰りを終えたところです。ボーリングバーが貫通してもチャックに傷を付けないよう被削剤をチャックから浮かせて芯出しして固定するのが結構大変でした。10mmのアルミ板をチャックと被削剤の間に挟みましたが、一つ爪をゆるめるとアルミ板が抜け落ちるという苦労をしました。正確な厚みの磁石が二つ用意できるともっと楽に出来ます。(手元にあった磁石はあいにく0.05mmくらいだけ厚みが違っていて駄目でした。) Boring the inner side with home made cutter. |
 中ぐり用バイトのクローズアップです。3Rに作ってあります。 中ぐり用バイトのクローズアップです。3Rに作ってあります。この時点ではボーリング穴は76.2+0.02以内に仕上げてあります。 Close up view of the boring bar. |
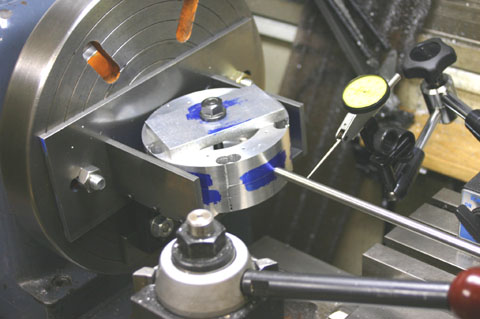 シリンダー取り付け穴のボーリングです。3つ上の写真のけがき時に一カ所のみシリンダー穴のセンターをけがきセンタードリルでドリリングしてあります。被削剤をアングルプレートに固定し、この穴をたよりにアングルプレートのセンター出しをしています。アングルプレートのセンターが出てしまえば、後はスピゴットプレートとピンでクランクケースの位置は規定されますので他のシリンダーのボーリングはセンター出しが必要なくなります。 シリンダー取り付け穴のボーリングです。3つ上の写真のけがき時に一カ所のみシリンダー穴のセンターをけがきセンタードリルでドリリングしてあります。被削剤をアングルプレートに固定し、この穴をたよりにアングルプレートのセンター出しをしています。アングルプレートのセンターが出てしまえば、後はスピゴットプレートとピンでクランクケースの位置は規定されますので他のシリンダーのボーリングはセンター出しが必要なくなります。Centering the cylinder site, with angle plate on the face plate. |
 全てのシリンダーのボーリングが終わり、今度はフライス盤にアングルプレートをセットしてシリンダー間をミーリングしています。 全てのシリンダーのボーリングが終わり、今度はフライス盤にアングルプレートをセットしてシリンダー間をミーリングしています。Milling between cylinders. The angle plate is mounted on the milling table. |
 オイルパン部分のミーリングです。いきなり20φのエンドミルは使わず次第に太いものに換えて被削剤やアングルプレートに負担をかけないようにしてやっています。 オイルパン部分のミーリングです。いきなり20φのエンドミルは使わず次第に太いものに換えて被削剤やアングルプレートに負担をかけないようにしてやっています。Milling the ail sump area. |
 旋盤では出来ない円周の途切れたシリンダー外周のミーリングです。 旋盤では出来ない円周の途切れたシリンダー外周のミーリングです。アングルプレートをロータリーテーブルにセットして作業します。 Milling the cylinder area. This part could not turn because of interruption on the circle. |
 クローズアップです。 クローズアップです。Close up view. |
 全ての機械作業が終わりました。後は手仕上げです。 全ての機械作業が終わりました。後は手仕上げです。ヤスリ、サンドペーパー、スコッチブライト総動員で、数時間の作業です。 今までかけてきた時間から見ればわずかなものです。 All of the machining was finished. Now I start the hand work with file and sand paper. |
 完成しました。 完成しました。元の材料の10%位は残っているでしょうか。 Finished. |
 別の角度から。 別の角度から。Another view. |
| 次回はフロントカバー、ギアーケースなどでしょうか。 これらもかなり複雑な構造で大変そうです。 |